

How to Repair a Whale EP1612 Pump: A Budget-Friendly DIY Guide
- Caravan Coach

- Jan 8
- 9 min read

Whale EP1612 pump Repair - Introduction
A reliable water supply is essential for comfortable caravanning, and the Whale EP1612 Watermaster pump assembly is one of the most widely fitted systems in UK caravans. When the submersible pump fails, many owners assume they need to purchase an entirely new assembly, which can cost between £50 and £80. However, there is a cost-effective alternative that can restore your water system for a fraction of the price.
This guide walks you through replacing just the pump element within your EP1612 assembly using a Whale GP1652 High Flow submersible pump. The GP1652 is the same pump fitted inside the complete EP1612 unit, delivering up to 15.8 litres per minute at 12V. By replacing only the pump rather than the entire assembly, you can save approximately £20 to £40 whilst maintaining the same performance and quality.
Whether you are completing this repair at home or need to carry out an emergency fix whilst touring, this step-by-step guide provides everything you need to know. The process takes approximately 20 to 30 minutes and requires only basic hand tools and fundamental soldering skills.
Understanding Your Whale Watermaster System
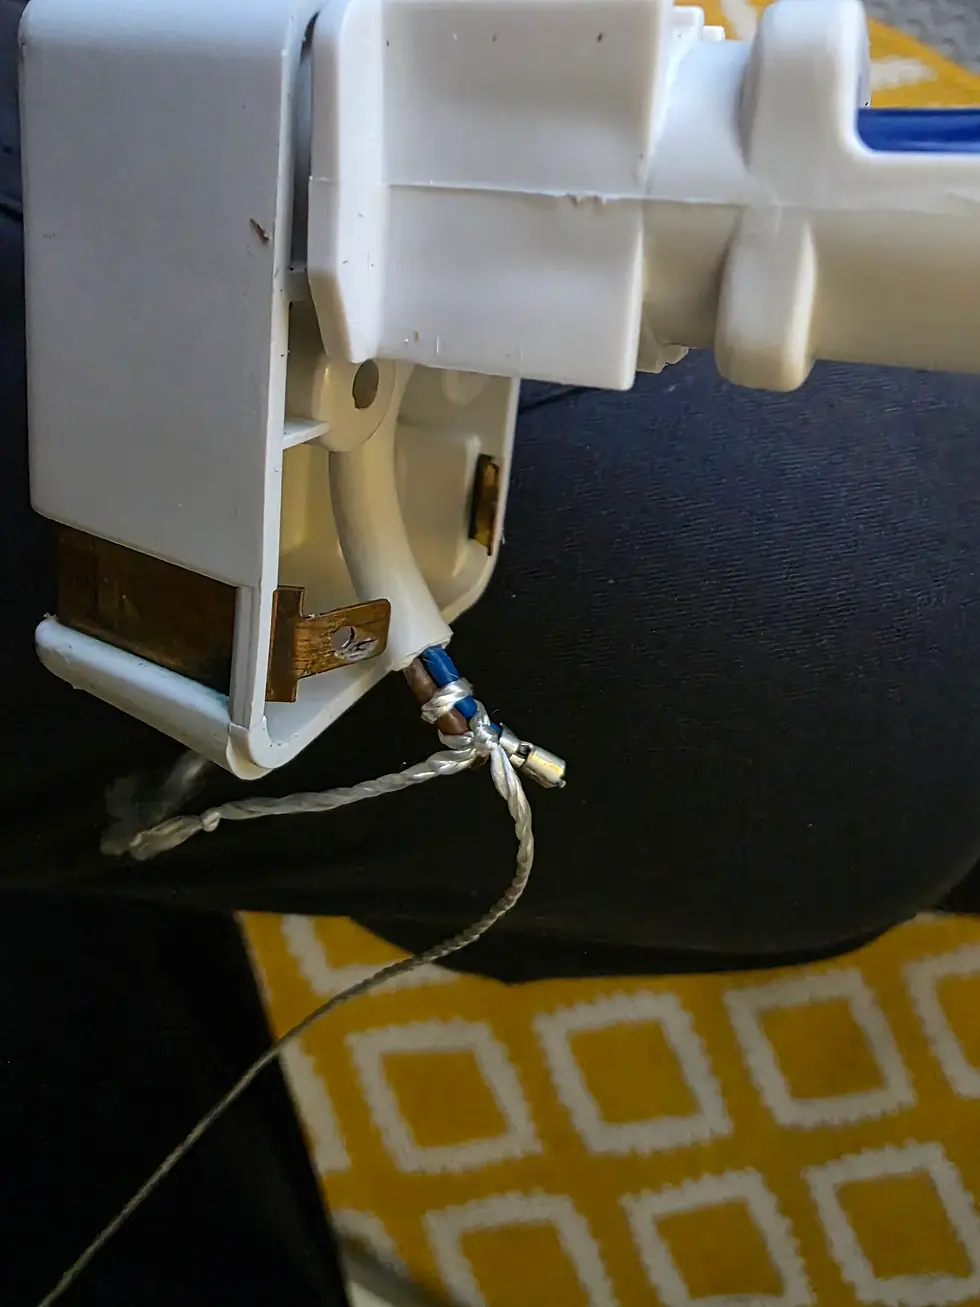
Before beginning the repair, it helps to understand how the Whale Watermaster system operates. The EP1612 assembly consists of three main components: a connector housing that plugs into your caravan's exterior socket, a length of blue reinforced hose carrying both water and the electrical cable, and a submersible pump that sits inside your water container such as an Aquaroll or similar.
How the System Works
When you turn on a tap inside your caravan, the system supplies 12V power via two flat copper strips within the connector, which activates the submerged pump. The pump continues pressurising the fresh water system until you close the tap, at which point the power is removed. This simple but effective design has made Whale Watermaster systems popular across the UK caravanning community for decades (Whale, 2024).
Common Causes of Pump Failure
Seal degradation: The impeller shaft emerges from the motor housing through an O-ring seal. Over time, this seal can deteriorate, allowing water to enter the motor and causing electrical failure.
Running dry: If your water container empties whilst the pump is operating, the motor can overheat without the surrounding water to keep it cool. This is the most common cause of pump failure, and many pumps carry a 'Do not run dry' warning.
Cable entry failure: The seal where the supply wire enters the motor housing can also leak over time, causing internal damage.
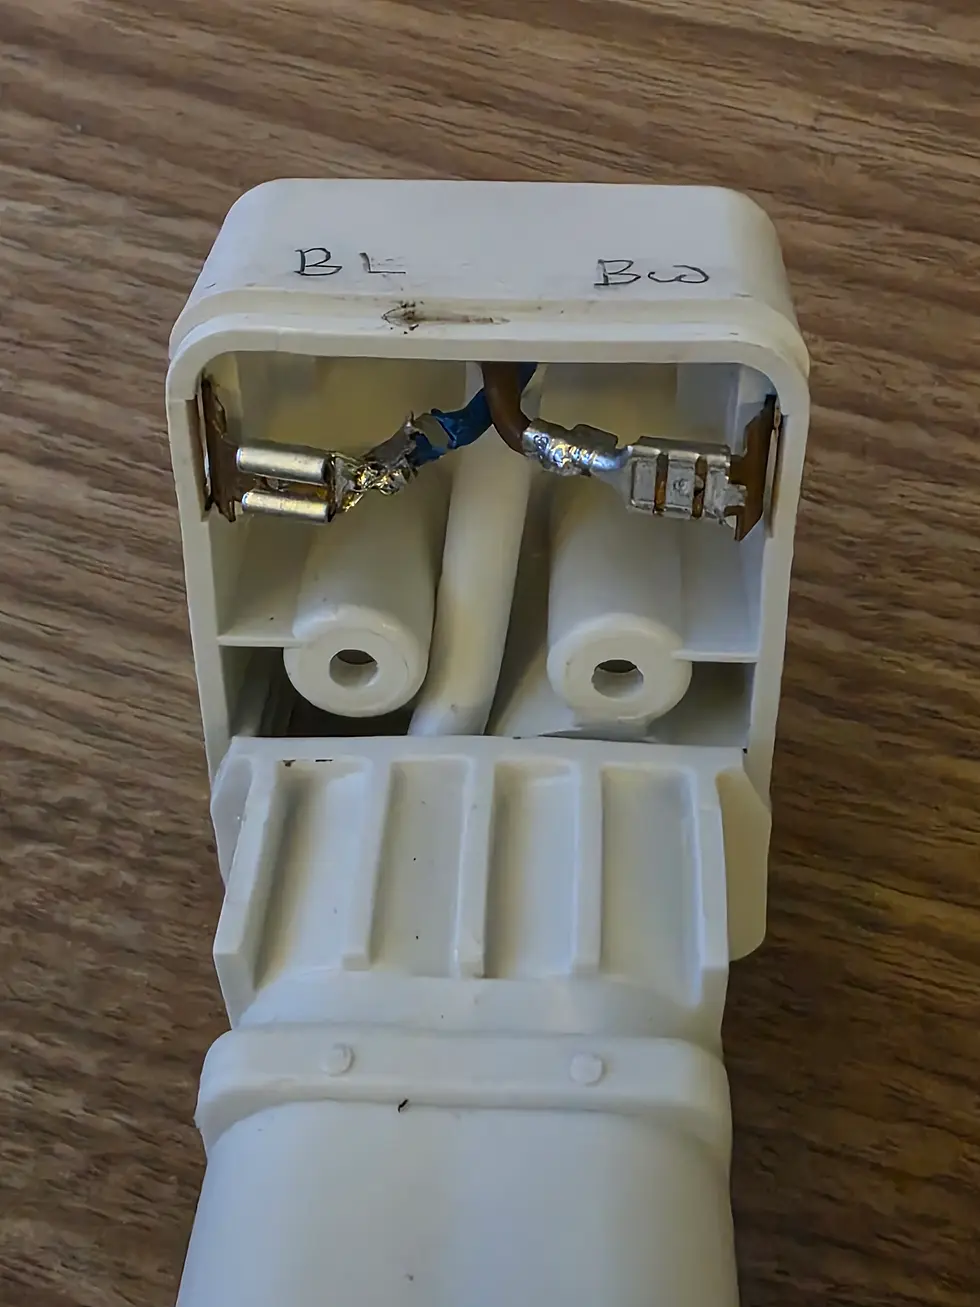
Terminal corrosion: Oxidation and corrosion on the electrical terminals within the connector housing can cause intermittent operation or complete failure.
Why Choose the Whale GP1652 for This Repair
The Whale GP1652 High Flow submersible pump is essentially the same pump fitted within the complete EP1612 assembly, making it a direct replacement. This 12V pump delivers up to 15.8 litres per minute at 3.8 amps, featuring an anti-air-locking design that prevents priming issues (Whale, 2024). The pump is manufactured from high-quality ABS housing with a stainless steel impeller, providing reliable service life.
Cost Comparison
Complete EP1612 assembly: Typically £50 to £80 depending on retailer
GP1652 pump only: Approximately £30 to £40
Potential savings: £20 to £40 by replacing just the pump element
The GP1652 is designed for use with both microswitch and pressure switch water systems, making it compatible with virtually all caravan installations. Its compact, lightweight design fits easily into water containers, and the built-in strainer protects against debris entering the pump mechanism.
Tools and Materials Required
Before beginning this repair, gather all necessary tools and materials. Having everything to hand will make the process smoother and ensure you can complete the job in one session.
Essential Tools
Wire strippers: Required for preparing the cable ends. A quality wire stripper makes this task much easier and reduces the risk of damaging the copper strands.
Side cutters: Used for cutting wires to length and removing old spade terminals. A sharp pair ensures clean cuts.
Screwdrivers: Both Pozidriv and flat-blade screwdrivers are needed for disassembling the connector housing and working with the hose clamp.
Needle-nose pliers: Useful for manipulating wires and terminals in confined spaces, and for tensioning the crimp clamp.
Soldering iron and solder: Required for creating a secure joint when attaching the pull string to the new pump wiring, and for fitting new spade terminals. A 25-40 watt iron is suitable for this work.
String or cord: A length of thin, strong string is essential for threading the new pump cable through the blue hose assembly.
For those who carry a compact toolkit in their caravan, the Leatherman Wave+ Multi-Tool, featured on the Caravan Coach Handpicked Gear page, combines many of these functions in a single pocket-sized tool, making it ideal for emergency roadside repairs.
Materials Required
Whale GP1652 High Flow Submersible Pump: The replacement pump unit, available from caravan accessory retailers and online suppliers.
Spade terminals: Two 4.8mm right-angle (L-shape flag) spade crimp terminals with PVC covers. These are essential for reconnecting the pump to the connector housing.
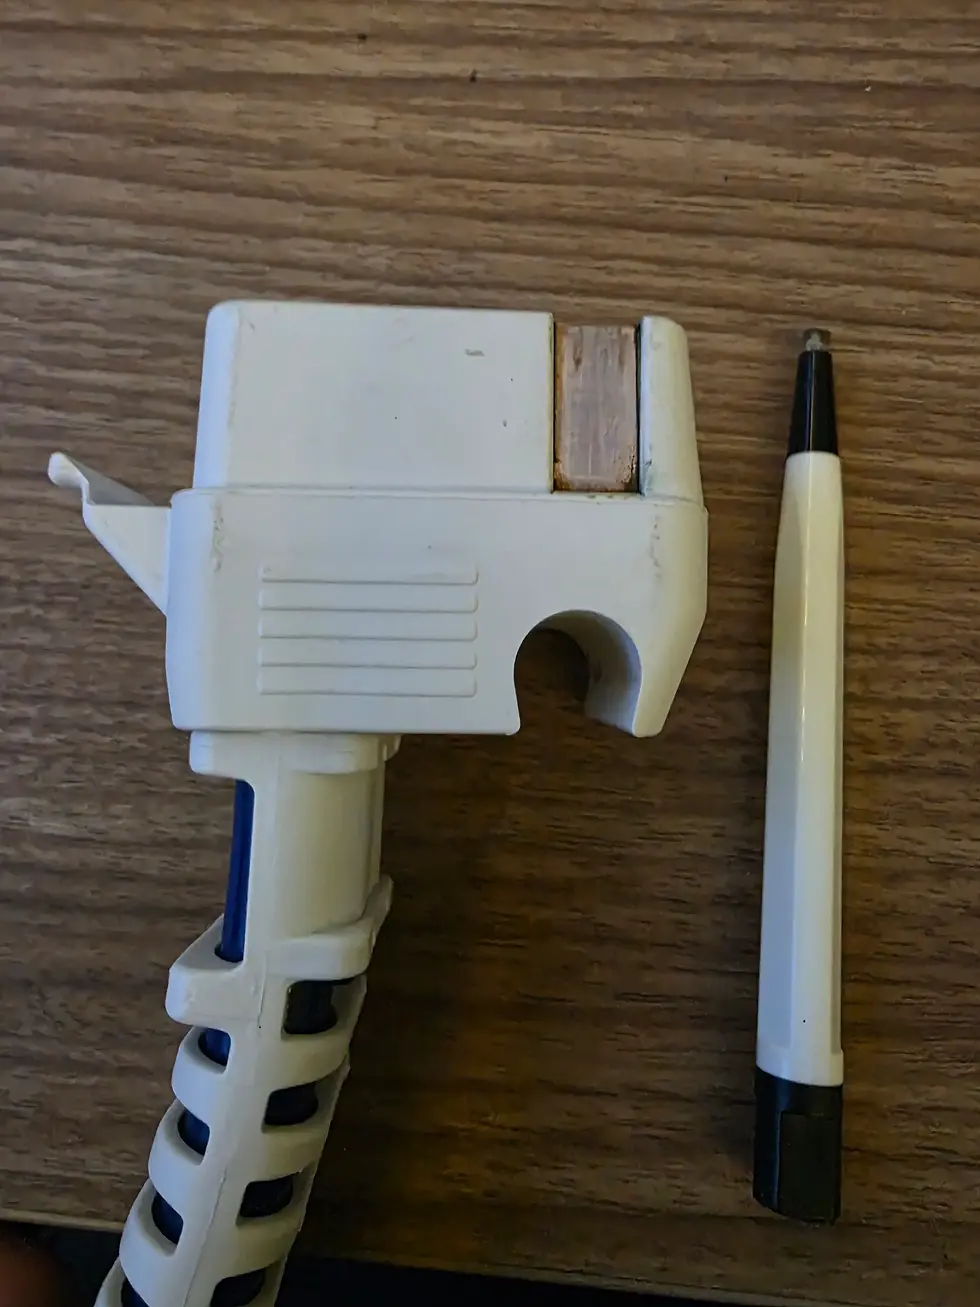
Terminal cleaning pencil or fine sandpaper: For removing oxidation from the connector terminals before reassembly. A fibreglass pencil or 400-grit sandpaper works well.
Step-by-Step Repair Guide
Follow these steps carefully to replace your pump. The images accompanying this guide illustrate each stage of the process.
Step 1: Gather Your Tools
Lay out all your tools before beginning: wire strippers, side cutters, screwdrivers (both Pozidriv and flat-blade), needle-nose pliers, soldering iron with solder, and a length of string. Having everything organised saves time and prevents frustration during the repair.

Step 2: Remove the Connector Housing Screws
Locate the two screws securing the water connector housing together. Using a Pozidriv screwdriver, remove both screws and carefully separate the two halves of the housing. Set the screws aside safely as you will need them for reassembly.

Step 3: Label the Wiring Placement
Before disconnecting any wires, take a photograph or make a clear note of which wire connects to which terminal. Polarity is important for the pump to operate correctly. You may wish to use small labels or coloured tape to mark the positive and negative connections. This simple step prevents confusion during reassembly and ensures your repair works first time.

Step 4: Remove Wires and Attach the Pull String
Remove the two wires from their spade terminal connectors within the housing. Using your side cutters, cut the spade terminals off the ends of the wires. Before pulling the old cable out, tie a length of strong string securely to the end of the wires. This string will act as a guide for pulling the new pump cable back through the hose during reassembly. Ensure the knot is secure but not bulky.
Note: it is possible to complete this repair with out the string, but it will require you to disturb the hose connection to route the cable successfully into the connector housing. If the hose connection is disturbed you may need to add some adhesive to prevent leaks on assembly.
Step 5: Release the Pump from the Hose
At the pump end of the assembly, locate the crimp clamp securing the hose to the pump outlet. Using a flat-blade screwdriver, carefully pry the crimp clamp apart to loosen it. Once loosened, you can slide the hose off the pump outlet. Work gently to avoid damaging the hose, which you will reuse with the new pump.

Step 6: Pull the Wiring Through with the String
Carefully pull the old pump wiring through the blue hose, drawing the string along with it. The string should emerge from the hose end along with the pump cable. Keep the string in place within the hose, as it will be essential for threading the new cable back through.

Step 7: Attach String to the New Pump Wiring
Take your new GP1652 pump and attach the string securely to its wiring. For the most reliable connection, temporarily solder the new pump wires together. This creates a strong tie point that will not pull apart when threading the cable through the hose. Allow the solder joint to cool completely before proceeding.

Step 8: Thread the New Cable Through
From the connector housing end, pull the string steadily to draw the new pump cable through the blue hose. Work slowly and avoid jerking movements that could snag the cable. Continue pulling until the cable emerges fully into the connector housing, with the pump positioned correctly at the hose outlet end.

Step 9: Solder New Spade Terminals
Cut the ends off the tied cables and strip the insulation, leaving approximately 4 mm of exposed cable. Solder the new 4.8mm spade terminals to the wire ends, ensuring good solder flow for a secure electrical connection. Reconnect the terminals to their marked positions within the housing, ensuring correct polarity.
Note: You may need to add insulation or bend the new terminals slightly to prevent contact with one anther that would otherwise result in a short circuit.
Step 10: Reassemble the Connector Housing
Bring the two halves of the connector housing back together, ensuring the wires are properly seated and not pinched. Replace the two screws you removed earlier and tighten them securely. The housing should close completely with no gaps.
Step 11: Tension the Hose Crimp
Push the hose firmly onto the new pump's outlet fitting. Using your side cutters or needle-nose pliers, squeeze the crimp clamp back together to secure the hose to the pump. The clamp should grip firmly without crushing the hose. Test by gently twisting the hose.

Step 12: Clean the Connector Terminals
Before testing, use a terminal cleaning pencil or fine sandpaper to remove any oxidation and debris from the pump connector terminals. Oxidised terminals are a common cause of poor connections and intermittent operation. Clean both the fixed terminals within the caravan's socket and the contact strips on your connector housing. Bright, clean metal ensures reliable electrical contact.
Step 13: Recalibrate and Test
With the repair complete, it is time to test your work. Place the new pump into your water container and connect the assembly to your caravan. Turn on a tap to activate the pump and check for proper water flow. Listen for smooth, quiet operation without unusual noises.
Check all connections for leaks, particularly at the hose-to-connector junction if you disturbed this in the repair. If your system includes a pressure switch, you may need to recalibrate it according to the manufacturer's instructions.
Safety Considerations
Working with 12V electrical systems is generally safe, as the voltage is not high enough to cause electric shock. However, some precautions are still necessary to ensure a safe and successful repair.
Disconnect power: Before beginning any work on the electrical connections, ensure your caravan's 12V system is isolated. This prevents accidental shorts and protects both you and the electrical system.
Soldering safety: Use a soldering iron in a well-ventilated area and place it in a secure holder when not in use. The tip reaches temperatures that can cause serious burns, so work carefully and keep flammable materials away from your work area.
Correct fusing: Ensure your caravan's pump circuit is correctly fused to protect against overload. Using an incorrectly rated fuse can create fire hazards. If in doubt, consult the manufactures literature for specific details.
Watertight connections: Although the electrical connections within the housing are protected from water, ensure the housing is properly sealed after reassembly. Water ingress can cause corrosion and eventual failure.
Troubleshooting Common Issues
If your repaired pump does not operate correctly, work through these common issues before assuming a fault with the new pump.
Pump does not run: Check the polarity of your spade terminal connections. If reversed, the pump will not operate. Also verify that the terminals between the pump and caravan are making good contact and that the caravan's 12V supply is active.
Intermittent operation: This usually indicates poor terminal contact. Remove the connector and re-clean the terminals with a fibreglass pencil or fine sandpaper until bright metal is visible. Ensure the spade terminals are crimped/soldered securely to the wires.
Low water pressure: Check that the hose is not kinked and that the pump strainer is not blocked with debris. Also ensure the hose is fully seated on the pump outlet and the crimp clamp is tight.
Water leaks at pump connection: Re-tension the crimp clamp or replace it if damaged. The hose must form a watertight seal with the pump outlet.
Conclusion
Replacing the pump element within your Whale EP1612 Watermaster assembly is a straightforward repair that offers significant cost savings compared to purchasing a complete replacement unit. The Whale GP1652 High Flow pump provides identical performance to the original, delivering reliable water pressure for your caravan's taps and shower.
With basic tools and approximately 30 minutes of work, you can restore your water system to full functionality. The key to success lies in careful preparation, particularly labelling your wire positions and using a pull string to thread the new cable through the hose. Taking time to clean your terminals before reassembly will also ensure reliable operation for years to come.
For those who prefer to be prepared for emergencies whilst touring, consider keeping a spare GP1652 pump in your caravan. At under £40, it represents inexpensive peace of mind that could save a trip should your pump fail away from home. As always, if you are uncertain about any aspect of this repair, consult a qualified caravan engineer.
Disclaimer
The information provided on this website is intended for general knowledge and informational purposes only. It does not constitute professional advice of any kind, including financial, legal, or medical advice. The author makes no representations or warranties as to the accuracy, completeness, or reliability of the content.
You should consult with a qualified professional before making any decisions based on the information presented here. The author is not liable for any damages, losses or injuries arising from the use or reliance on this website or its content.
External links are provided as a convenience and do not necessarily reflect the author's views or opinions. The author is not responsible for the content of external websites.
By using this website, you agree to these terms and conditions.


